
My blog now features HTTP/2 support thanks to the latest version of NginX. I'm going to walk through how to build the latest version of NginX and enable HTTP/2 support on your own server.
Install the latest version
At the time of writing the latest mainline version of NginX is 1.9.5 and this is what I will be using in this tutorial. If there is a later version of NginX available you can substitute the version numbers in the commands as you go through. The mainline versions of NginX aren't really intended for use on production servers and they can have a bug or two. I've not had any issues yet but this is something you need to think about before continuing and installing a bleeding edge version of your web server. If you've decided to give it a try, let's get to it!
Download and unzip the latest version of NginX. (Get latest version here)
cd ~
wget http://nginx.org/download/nginx-1.9.5.tar.gz
tar -xzvf nginx-1.9.5.tar.gz
This would also be a great opportunity to build in the latest version of PageSpeed. PageSpeed is a performance module that allows you to do on-the-fly optimisations of your pages and assets. Things line collapsing white space, removing comments, removing quotes that aren't lexically required and a whole boat load of additional features I can't even list. Have a look at the blog I've linked and see if you want to do that here. You can always come back later and re-build NginX with PageSpeed.
Next you need to get your NginX configuration arguments to ensure we build the new version of NginX to the same specification.
nginx -V
Note the use of the upper case V in that command and it should produce an output similar to this:
nginx version: nginx/1.9.5
built by gcc 4.6.3 (Ubuntu/Linaro 4.6.3-1ubuntu5)
built with OpenSSL 1.0.1 14 Mar 2012
TLS SNI support enabled
configure arguments: --add-module=/home/scott/ngx_pagespeed-1.9.32.6-beta --prefix=/usr/share/nginx --conf-path=/etc/nginx/nginx.conf --http-log-path=/var/log/nginx/access.log --error-log-path=/var/log/nginx/error.log --lock-path=/var/lock/nginx.lock --pid-path=/run/nginx.pid --sbin-path=/usr/sbin/nginx --http-client-body-temp-path=/var/lib/nginx/body --http-fastcgi-temp-path=/var/lib/nginx/fastcgi --http-proxy-temp-path=/var/lib/nginx/proxy --http-scgi-temp-path=/var/lib/nginx/scgi --http-uwsgi-temp-path=/var/lib/nginx/uwsgi --with-debug --with-pcre-jit --with-ipv6 --with-http_ssl_module --with-http_stub_status_module --with-http_realip_module --with-http_auth_request_module --with-http_addition_module --with-http_dav_module --with-http_geoip_module --with-http_gzip_static_module --with-http_image_filter_module --with-http_sub_module --with-http_xslt_module --with-mail --with-mail_ssl_module --sbin-path=/usr/sbin/nginx --with-http_v2_module
You need to take a copy of the configure arguments section as we're going to need that next when we build NginX. Once you have the configure arguments copied, let's move into the directory that contains all of the files.
cd ~/nginx-1.9.5
This is a great opportunity to make another unrelated tweak and alter the value of your Server header in the source before we proceed. If this interests you, you can follow the really simple instructions here, if not, just carry on.
Now we're ready to start building NginX and you're going to issue the ./configure command followed by the configure arguments you copied earlier. Before we do that though, there may be 2 small changes required to your configure arguments. First of all if you have the value --with-http_spdy_module in your configure arguments you need to remove it as HTTP/2 is going to be replacing SPDY. Secondly, whether or not you had to remove the SPDY module, you need to add the HTTP/2 module with --with-http_v2_module. Adding this on to the end is fine and you should end up with a command similar to this:
./configure --add-module=/home/scott/ngx_pagespeed-1.9.32.6-beta --prefix=/usr/share/nginx --conf-path=/etc/nginx/nginx.conf --http-log-path=/var/log/nginx/access.log --error-log-path=/var/log/nginx/error.log --lock-path=/var/lock/nginx.lock --pid-path=/run/nginx.pid --sbin-path=/usr/sbin/nginx --http-client-body-temp-path=/var/lib/nginx/body --http-fastcgi-temp-path=/var/lib/nginx/fastcgi --http-proxy-temp-path=/var/lib/nginx/proxy --http-scgi-temp-path=/var/lib/nginx/scgi --http-uwsgi-temp-path=/var/lib/nginx/uwsgi --with-debug --with-pcre-jit --with-ipv6 --with-http_ssl_module --with-http_stub_status_module --with-http_realip_module --with-http_auth_request_module --with-http_addition_module --with-http_dav_module --with-http_geoip_module --with-http_gzip_static_module --with-http_image_filter_module --with-http_sub_module --with-http_xslt_module --with-mail --with-mail_ssl_module --sbin-path=/usr/sbin/nginx --with-http_v2_module
You should see a lot of output zipping by and eventually end up at something that resembles this:
Configuration summary
+ using system PCRE library
+ using system OpenSSL library
+ md5: using OpenSSL library
+ sha1: using OpenSSL library
+ using system zlib library
nginx path prefix: "/usr/share/nginx"
nginx binary file: "/usr/sbin/nginx"
nginx configuration prefix: "/etc/nginx"
nginx configuration file: "/etc/nginx/nginx.conf"
nginx pid file: "/run/nginx.pid"
nginx error log file: "/var/log/nginx/error.log"
nginx http access log file: "/var/log/nginx/access.log"
nginx http client request body temporary files: "/var/lib/nginx/body"
nginx http proxy temporary files: "/var/lib/nginx/proxy"
nginx http fastcgi temporary files: "/var/lib/nginx/fastcgi"
nginx http uwsgi temporary files: "/var/lib/nginx/uwsgi"
nginx http scgi temporary files: "/var/lib/nginx/scgi"
If you get any errors during this process it's most likely due to some missing dependencies on your system. You will get some indication of which packages are missing and can select from the following commands the one that will install what you need.
sudo apt-get install build-essential zlib1g-dev libpcre3 libpcre3-dev
sudo apt-get install libgeoip-dev
sudo apt-get install libgd2-xpm libgd2-xpm-dev
sudo apt-get install libxslt-dev
sudo apt-get install libssl-dev
If you do need to use any of the above commands to install new packages, run the command make clean and then go back to the ./configure command followed by your configure arguments. Once you get a successful result you need to make and install NginX with the following commands.
make
sudo make install
Although everything is ready to go we need to make a few changes to our configuration files before we start the new version of NginX.
Configuration changes
In your vhost files you now need to tell NginX that we want to use HTTP/2. Modify all of your vhost files and remove any reference to spdy that might exist.
server {
    listen 443 spdy ssl;
    listen [::]:443 spdy ssl;
Once that's done you need to tell NginX to use the new HTTP/2 protocol.
server {
    listen 443 ssl http2;
    listen [::]:443 ssl http2;
Save the changes to all of your vhost files and you're ready to restart NginX and bring up the new version.
sudo service nginx restart
You can check to make sure you're now using the latest version.
nginx -v
Note the user of the lower case v in this command and you should be looking for the version of NginX that you downloaded in the first step.
nginx version: nginx/1.9.5
Testing it out
That's it! You're now rocking HTTP/2 support and you can check to make sure everything is working in Chrome by navigating to chrome://net-internals/#http2.
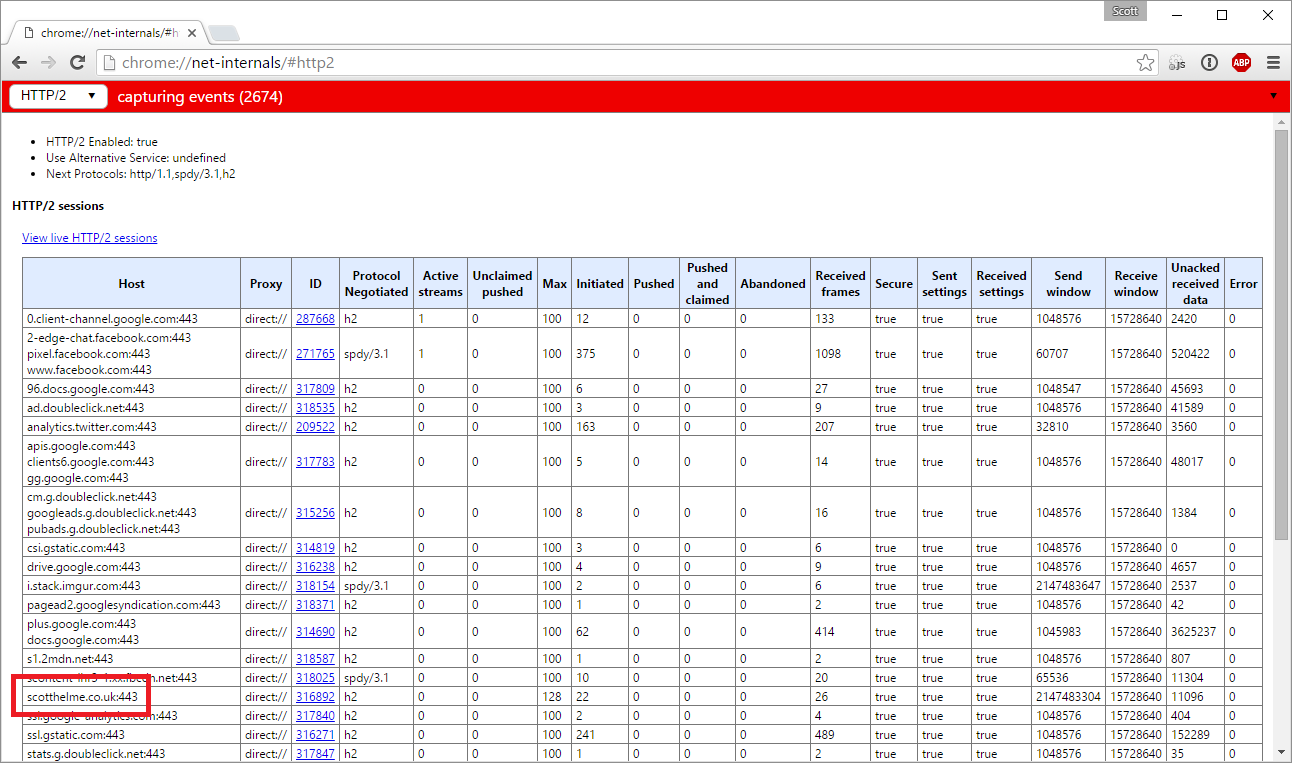
You should see your domain in the list and h2 in the Protocol Negotiated column. Have a click around your site and see if you can see any noticeable improvement in the performance. I could see some quite clear leaps in performance right away and the few metrics I track also indicate a reduction in page load times. If you get HTTP/2 up and running on your site let me know in the comments below.